
FIBREGLASS POOLS
Fibreglass pool renovation
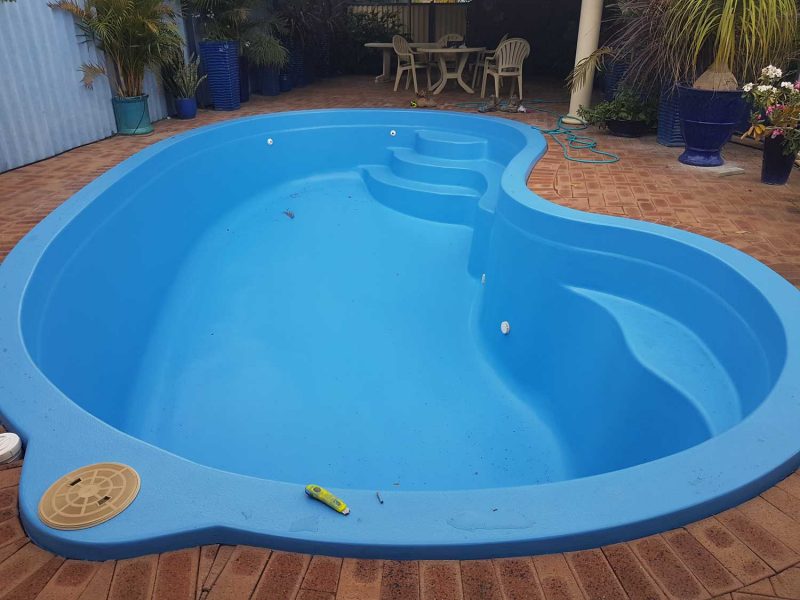
Relaxing by your in-ground pool is an act of luxury. But what you may not know is that your pool can also add value to your home, provided it is maintained properly throughout the years.
Here’s everything you need to know about renovating your fibreglass pool.
Pool renovation or pool resurfacing is a cost effective way of repairing a number of issues with your pool’s shell.
A very economical method compared to the price of new pool shell.
During a pool renovation black spots, osmosis bubbles, chips and cracks are repaired. Then a new surface is applied to your existing shell followed by a number pool safe gel coat layers, leaving you with a new, strong and vibrant pool that will transform your outdoor area.
How often should my pool be resurfaced?
Resurfacing a fibreglass pool is recommended every 15 to 30 years, however this can vary depending on the condition of your pool.
How do I know if my fibreglass pool needs resurfacing?
Be proactive, don’t just put it off. Especially if you notice any of these signs:
CHALKY/FADED GEL COAT SURFACE
Place the palm of your hand beneath the water line and flat against the pool wall. Slowly and firmly move your hand across the surface to see if the gel coat turns milky/cloudy when wiped.
A failed gel coat will require a resurface.
Your chemicals will be harder to balance and the cloudy gel coat is not good for your health.
The condition of your gel coat surface is also very important, especially as this is the key chemical barrier between your pool water and the structure of your shell.
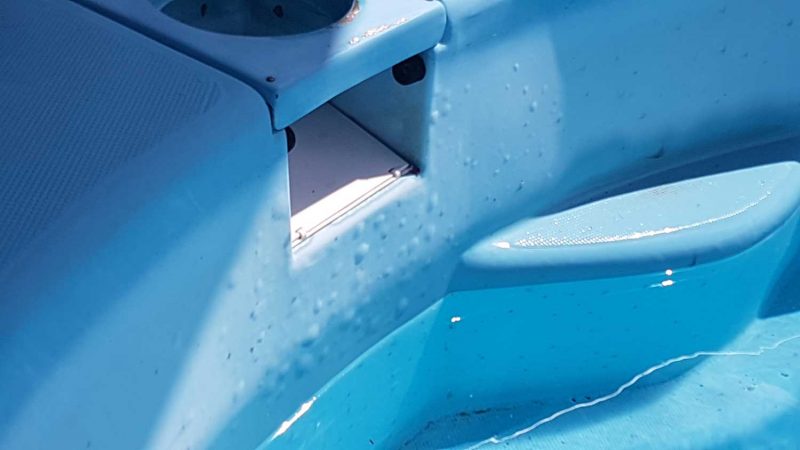
SURFACE BUBBLES/OSMOSIS
Take a good look at the surface of your pool beneath the water. You may not have noticed before, but there may be a number of small – large osmosis bubbles. Although these bubbles are not harmful to your health, they will only get bigger in size and numbers if ignored.
Over time, osmosis bubbles will effect the integrity of your pool structure and cause small leaks.
BLACK SPOTS AND STAINS
Small and large black spots on your pool’s surface is a key indicator that your pool will need to be resurfaced.
These black spots can vary from a small pin head to a large opening in the gel coat with dark fading lines.
Unfortunately you cannot get rid of black spots without a professional resurface.
Chemicals and epoxy paints will only mask the problem for a short time. Once fixed, a new strong fibreglass layer is needed to keep the black spots from returning.
The Perth Fibreglass way to renovate your pool
Perth Fibreglass Pools team of renovations specialists will use the following steps to completely renovate your pool:

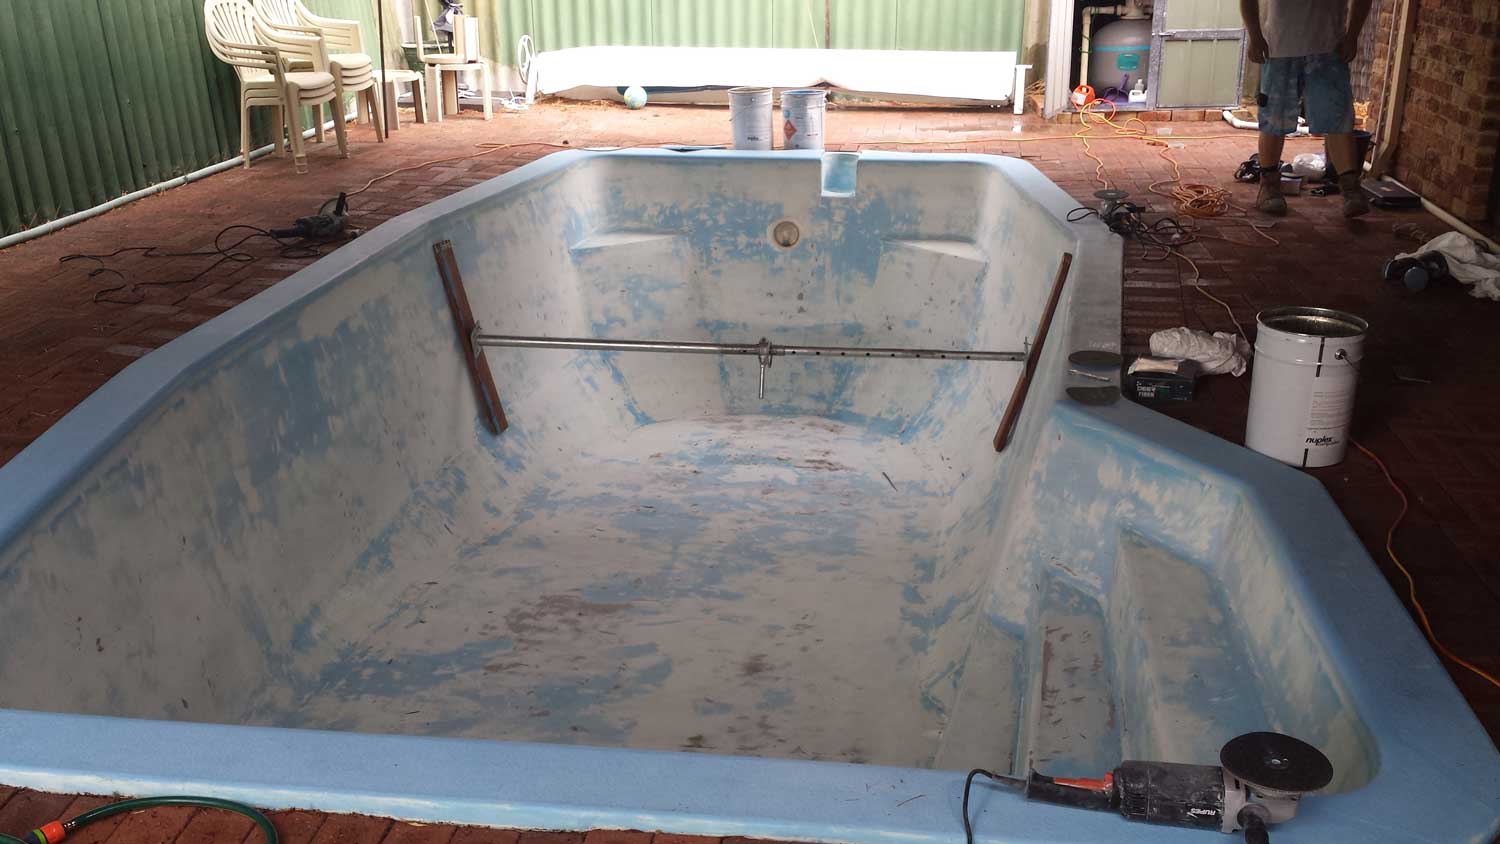
BRACING AND EMPTYING
The team will install adjustable acrow props to your fibreglass pool to brace the pool walls. There is a risk of the walls moving when the pool water is taken away. Sometimes we will keep the braces in the pool throughout the job if we suspect any further movement.
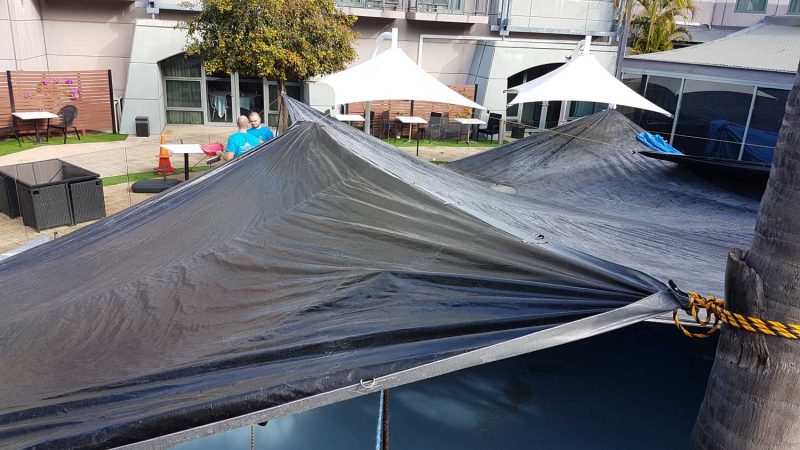
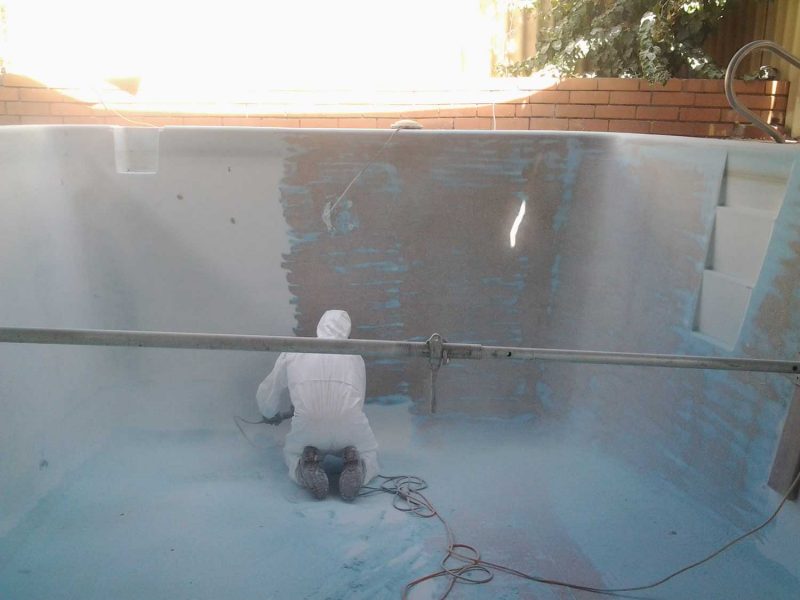
Covering the pool
Tarps are erected over the pool during renovation. The tarps keep us protected from the weather and limits the amount of dust/debris escaping from the work site. UV rays from the sun can effect curing times and the finishing top coat is 100% UV free.
Osmosis and Black spot treatment
Osmosis bubbles are singled out during the grind and individually repaired. The outer layer of the bubble is ground off and the inner part is dug out with a smaller tool. We make sure that the bubble is completely dry before we apply our vinyl ester putty.
Osmosis bubbles can range from the size of 5 cent piece to the size of a dinner plate and between 0-500 per pool.
The black spots are ground back to the source. The damaged fibreglass is removed and treated with a high quality vinyl ester resin.
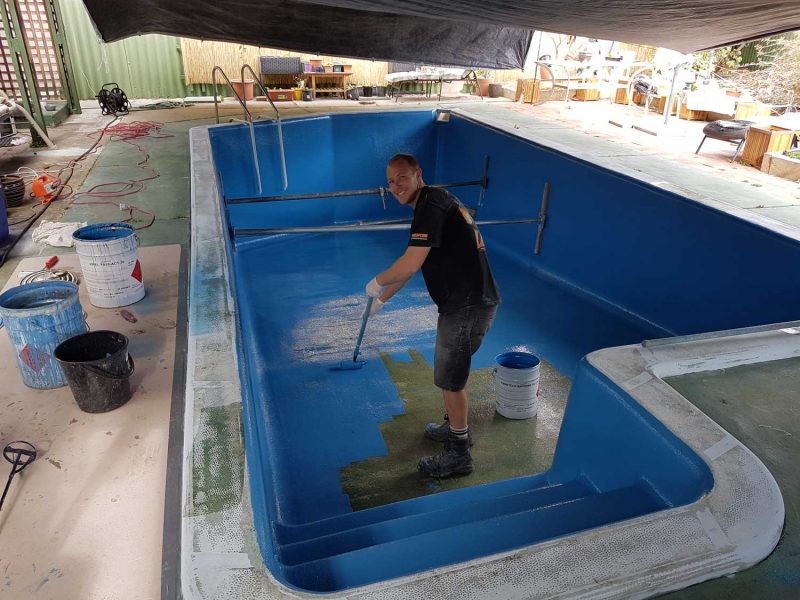
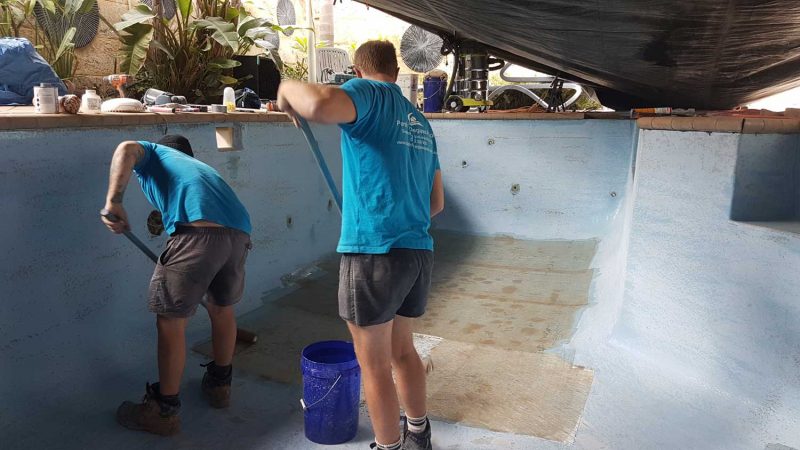
Fill coat layer
The cured fibreglass layer will be lightly sanded to eliminate sharp edges.
A layer of FIBRETECH vinyl ester fill coat is applied with rollers to the entire pool. The fill coat layer will fill any small gaps between the fibreglass matting. It also acts as a great chemical barrier and an important primer ready for top coat. The fill coat is left to cure and then sanded back to provide an even finish.
AQUAGUARD finishing top coat
The final layer applied to the pool is the Aquaguard coloured top coat. The top coat is applied with 180mm high quality rollers and brushes. We take great care to ensure the top coat is correctly applied. We measure the ambient temperature, moisture levels, and heat spots within the pool.
We match this information with correct levels of catalyst in our mixtures and also use this information to determine the size of each mix. Generally a 1% – 2% catalyst to top coat ratio is used.
We allow the top coat to cure naturally to ensure the wax rises to the surface before we remove our tarps.
Emptying the pool water
The pool water is emptied through our high powered pumps. We have over 100m of pipework so big blocks and long driveways are no problem. We also have specialist pumps for dirty water pools. Typically a 40’000ltr pool can be emptied in 2.5hrs.
Heavy grinding
The gel coat is removed with heavy duty grinders. During the process we identify osmosis bubbles and take away black spots. Our fully trained team wear correct PPE and full face respirators during the grinding process. The dust is contained, cleaned and removed from site. Typically a 40’000 litre pool can be fully ground in 2-5hrs depending on the condition of the gel coat and the amount of osmosis bubbles.
Fibreglass layer
A layer of fibreglass is applied to the entire pool. This layer adds strength to your pool and acts as a solid protective barrier from future osmosis and black spot.
Perth Fibreglass Pools uses a base layer of vinyl ester resin, followed by 300gsm fibreglass matting and and another layer of vinyl ester resin. Applied with 180mm rollers, the resins consolidate through the matting and bond to the original shell. Double layers can be applied in weak areas of your pool for extra strength.
Final preparation
Before the top coat is applied, the team scrutineer their work, looking for imperfections or defects. We repair and smooth out anything we feel necessary to achieve a great finish.
At this stage we apply our unique non skid system to the steps and edge beams. The outer edges of the non skid are taped to give prominent lines, thus producing a great, professional finish to the pool.
Finished
The team will give a final inspection of the pool and remove the tarps.
We clean the area and take away all rubbish leaving you with a vibrant new pool surface that will rejuvenate your outdoor area for many years to come
The Perth Fibreglass way to renovate your pool
Perth Fibreglass Pools team of renovations specialists will use the following steps to completely renovate your pool:
![]()
BRACING AND EMPTYING
The team will install adjustable acrow props to your fibreglass pool to brace the pool walls. There is a risk of the walls moving when the pool water is taken away. Sometimes we will keep the braces in the pool throughout the job if we suspect any further movement.
![]()
Emptying the pool water
The pool water is emptied through our high powered pumps. We have over 100m of pipework so big blocks and long driveways are no problem. We also have specialist pumps for dirty water pools. Typically a 40’000ltr pool can be emptied in 2.5hrs.
Covering the pool
Tarps are erected over the pool during renovation. The tarps keep us protected from the weather and limits the amount of dust/debris escaping from the work site. UV rays from the sun can effect curing times and the finishing top coat is 100% UV free.
Heavy grinding
The gel coat is removed with heavy duty grinders. During the process we identify osmosis bubbles and take away black spots. Our fully trained team wear correct PPE and full face respirators during the grinding process. The dust is contained, cleaned and removed from site. Typically a 40’000 liter pool can be fully ground in 2-5hrs depending on the condition of the gel coat and the amount of osmosis bubbles.
Osmosis and Black spot treatment
Osmosis bubbles are singled out during the grind and individually repaired. The outer layer of the bubble is ground off and the inner part is dug out with a smaller tool. We make sure that the bubble is completely dry before we apply our vinyl ester putty.
Osmosis bubbles can range from the size of 5 cent piece to the size of a dinner plate and between 0-500 per pool.
The black spots are ground back to the source. The damaged fibreglass is removed and treated with a high quality vinyl ester resin.
Fibreglass layer
A layer of fibreglass is applied to the entire pool. This layer adds strength to your pool and acts as a solid protective barrier from future osmosis and black spot.
Perth Fibreglass Pools uses a base layer of vinyl ester resin, followed by 300gsm fibreglass matting and and another layer of vinyl ester resin. Applied with 180mm rollers, the resins consolidate through the matting and bond to the original shell. Double layers can be applied in weak areas of your pool for extra strength.
Fill coat layer
The cured fibreglass layer will be lightly sanded to eliminate sharp edges.
A layer of FIBRETECH vinyl ester fill coat is applied with rollers to the entire pool. The fill coat layer will fill any small gaps between the fibreglass matting. It also acts as a great chemical barrier and an important primer ready for top coat. The fill coat is left to cure and then sanded back to give good key.
Final preparation
Before the top coat is applied, the team scrutineer their work, looking for imperfections or defects. We repair and smooth out anything we feel necessary to achieve a great finish.
At this stage we apply our unique non skid system to the steps and edge beams. The outer edges of the non skid are taped to give prominent lines, thus producing a great, professional finish to the pool.
AQUAGUARD finishing top coat
The final layer applied to the pool is the Aquaguard coloured top coat. The top coat is applied with 180mm high quality rollers and brushes. We take great care to ensure the top coat is correctly applied. We measure the ambient temperature, moisture levels, and heat spots within the pool.
We match this information with correct levels of catalyst in our mixtures and also use this information to determine the size of each mix. Generally a 1% – 2% catalyst to top coat ratio is used.
We allow the top coat to cure naturally to ensure the wax rises to the surface before we remove our tarps.
Finished
The team will give a final inspection of the pool and remove the tarps.
We clean the area and take away all rubbish leaving you with a vibrant new pool surface that will rejuvenate your outdoor area for many years to come